How To Put a Pinterest Pin Button on Your Blog |
| How To Put a Pinterest Pin Button on Your Blog Posted: 18 Jul 2011 10:45 AM PDT You may have noticed a couple of times recently that we’ve added a Pinterest “Pin-It” button to posts that have key images that we’ve created. Images are a great way for people to visually keep track of posts they want to remember, or to share things they enjoyed with others. Pinterest is an exciting new platform that bridges the gap between social and visual. We love it! The “Pin-It” button is a great way to encourage your blog readers who use Pinterest to pin your content. This is good for them because they keep something they like or share cool stuff with their followers (or both), and it’s good for you because you set the image to be linked back to your blog post. This can bring good traffic to your blog and helps new people find you! First, the core code, as found on the Pinterest site, here. It’s exactly the same, except the code I’m using is already modified for use in a post here on EverythingEtsy.com. You can copy this code and use it on your blog. Just make sure you paste it into an HTML editing view, not a visual editor. You’ll need to make the following two simple changes for it to work for your image:
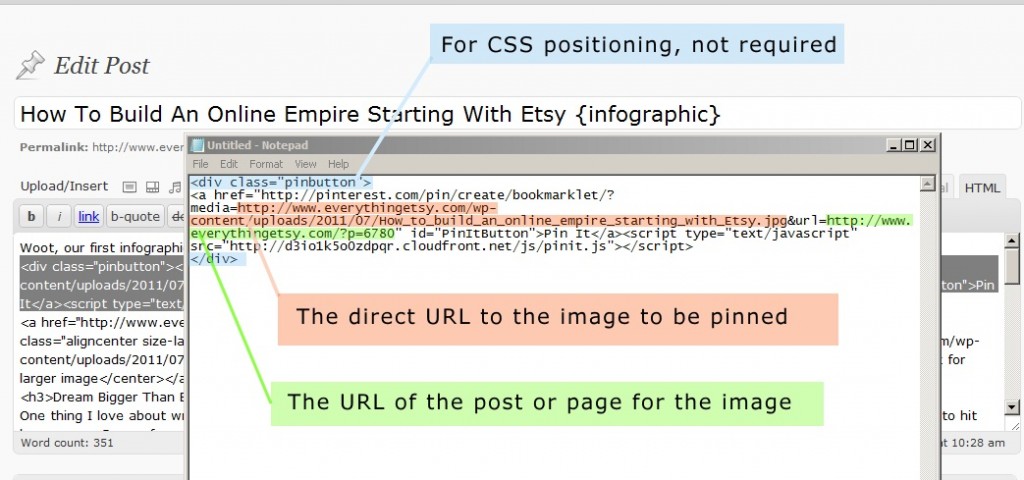
That’s really it. You can then paste that before or after your image in your post. Again, you must be in HTML to do this, and you probably don’t want to switch back to visual after your done, so save this for last. Here’s a picture that you can enlarge that shows the portions of code you need to change… The next part of this is optional and a little more advanced… For CSS Positioning If you’re somewhat familiar with CSS and can access the CSS for your site, you can create a new css element by using a div and a class, as seen in the photo above. Below is the CSS code we use to position the Pin Button above and to the right of the image. (the div has to be in the HTML before the image) This CSS code will have varying results based on your font sizes and overall set-up, but it can get you started with positioning the button where you want it in relation to the image. Again, the CSS portion of this isn’t required for it to work (and it will probably display different in different browsers anyway). Pin Away! That’s it, good luck and happy pinning. I’ll do my best to answer questions in the comments, so ask ‘em if you got ‘em and use the “subscribe to comments” option to be sure to get the response. ~ Tim (clearly not Kim on this one!) Note: For a reason beyond my understanding, this isn’t completely working in Internet Explorer, where it only shows a text link to pin it rather than a button. It works in Firefox, Chrome, Safari, and Opera. If anyone knows why it’s not showing up in IE, or if you use Internet Explorer and it is showing up, I’d love to hear about it. |
| You are subscribed to email updates from EverythingEtsy.com To stop receiving these emails, you may unsubscribe now. | Email delivery powered by Google |
| Google Inc., 20 West Kinzie, Chicago IL USA 60610 | |


No comments:
Post a Comment